If there is only 10% of the original Old Growth redwood left, then how can you use Redwood to make your products?
|
This is a great question and I'm glad it was the first because the whole philosophy of Craftsmanship and of being a craftsman is held in its answer.
I grew up in the Redwood forests of this area camping, hiking and later working, I worked as a surveyor for 12 years and have seen rural parts of this county that have rarely, if ever been visited by people. The sense of peace and magic that one feels in a forest has been a vital part of my life. During the past 27 years that I have run Blue Ox, first as a logging company and the last 24 years as millworks manufacturer, I have personally addressed this question from all angles and sides. Do I think we should ban all logging? ... NO - but in the same breath I am vehemently opposed to clear cut logging and the other short cuts used today to maximize corporate profits at the expense of the forest.
As for our products here at Blue Ox, all our Old Growth Redwood comes from logs that were felled and left by the original loggers 100 years ago. Because Redwood does not rot, these logs have lain on the forest floor all this time and are as sound today as they were then. I saw these logs on our sawmill on an "as needed" basis. By knowing the project and its needs, I can choose just the right cuts for that job with no waste. This is a key aspect of handling the resources with reverence, Another aspect of handling the resource with reverence is building to last. If we build our houses to last 200 to 300 years and then go back to the forest and ask for more, the forest has no problem putting up with that, It's this building junk that only lasts 20 to 30 years and then tearing it down and going back for more that the forest can't maintain!
So as the consumer, the responsibility is in a large part, yours. Demand a quality product that will last, a key element of true craftsmanship. back to Ask Eric page
|
We will take possession of a 1906 Victorian / Arts and Crafts home by mid-December. It has the original Chestnut trim and doors throughout. None of the woodwork has had any sort of refurbishing and, as a result, the varnish has dried and become "pebbled." Is there a process by which the finish can be "refreshed" without stripping?
|
Yes, you are in luck. If the "bright" finish is original then it is Shellac, which is derived from the Lac bug. Shellac is dissolvable in strong alcohol.
Go to your drug store and have them order you a gallon of 99% rubbing alcohol. Next wet a rag with the alcohol and in an inconspicuous spot see if this won't dissolve the old finish. If it does then get a quart can of Amber Shellac and in another container thin a small amount of the shellac with equal parts alcohol and paint this onto a small spot of woodwork. This should dissolve the old finish right into the new and then should dry smooth. Next with FINE steel wool polish this spot when dry and put another coat of shellac right from the original can (not the thinned mixture). You can repeat this until the desired smoothness and finish is reached. This is why I think shellac is the finest wood finish there, because years from now it will still be workable. back to Ask Eric page
|
We purchased a house last summer that we just found out was built in 1875! We still have all the original windows & a VERY high gas bill! (We also have a 70 year old steam boiler!) I don't want to lose the unique windows, but would also like more energy efficiency! I read that you were building wooden replacement windows for an old house. Would it be worth the trouble of replacing them? (We have a LOT of windows!)
|
Yes you can get the insulating value of thermal pane and still keep your wooden windows. It requires that you have new sashes (the frame that holds the glass) made to replace your existing. These have a deeper rabbit and profile to accept the wider glass and instead of putty to glaze the window we use wood stops. Once you receive these you can then order thermal glass units made to fit from your local glass company, install these in the new sashes and then trade out the new sashes for the old. This is much less expensive than replacing the whole window with new metal clad, and you can do all of the installation yourself. back to Ask Eric page
|
I am about to replace the windows in our home. I have gotten several estimates and the best one came from a company using Moss vinyl clad windows. I can't learn much about these windows. How would you rate these windows?
|
There are a few things all windows have in common. The questions should be 1) How long is the warrantee against "fogging" if they are thermal pane? 10 years is minimum and 15 is about the best. Those that say "as long as you own your house" are banking on the fact that you are going to move before the windows fog in 15 years. 2) If a glass pane is broken can the sash be taken out and the glass replaced without removing the entire window unit? This means you can do most of your own repair work. 3) On single and double hung units how long are the balances warranted and are they easily replaceable? These are the mechanical devices that help overcome gravity when opening the sash. These three questions should arm you with the information needed to make an informed decision. back to Ask Eric page
|
I have 60 year old redwood gutters that are leaking at the joints. We have had them repaired a number of times but wonder if it has been done correctly. How do you fix joints so that they don't leak and need constant attention? Should fiberglass tape be used? Are you familiar with ProFlex Geoseal product that was used with tape last time. Now someone recommends taking that out and cleaning and using Henrys seal. Also, when they work on joints how do I tell if it is time to replace the gutters versus just repair them? Can red cedar be used instead of redwood if I need to replace since it seems to be hard to locate old growth redwood and it is very expensive?
|
You are in good company!! There was a "secret" way that the joints were handled before WWII, this was abolished and now all the very old gutter joints are still working and the "newer" joints are failing. The " secret" was that after cutting the miter joint (either a 90' or running scarf) the installers would carve a relief in the bottom of the gutter trough of both pieces so as to create a small lake bed when the pieces were put together. This lake was then filled with calking and gave the flexibility to allow the gutters to expand and contract and not have the calking fail. You can create this lake after the fact with a pineapple bit rasp on a drill motor. You must first clean the gutter trough down to bare wood, since nothing should be put inside the gutters. Then rasp a small relief at each joint line and fill this relief to the level of the bottom of the gutter trough with a good grade of calking. This will solve your problems (providing your gutters are still sound). back to Ask Eric page
|
Where can I get some prints or templates for the making fancy gingerbread brackets for my porch? I also need ideas for the spandrels.
|
This is a question that comes up a lot. As it turns out there are no drawings for architectural details from the Victorian era, save for a few blueprints saved by mistake in private collections. We at Blue Ox have some 200 to 300 such blueprint drawings that I found over the years in dusty drawers of local Redwood Sawmills that were closing down. However, until we get time to scan these and put them on disk they remain in the safe.
So until then please feel free to visit our web site and use any of the designs found there, also look for the "Painted Ladies" series by Baer-Pomada-Larsen, "A Gift To The Street"by Olwell & Waldhorn, or "The Victorian Design Book" by Lee Valley. The hunting is half the fun. back to Ask Eric page
|
I have four sets of huge heavy pocket doors and they are all off of their tracks. I've looked at it from every angle and can't figure how to re-hang them without tearing off the woodwork.
|
The problem you are facing is in the design of the rolling hardware itself and probably will require taking off the casing molding on at least the first door. All the pocket door hardware I have seen consists of a flat bar in edge ( this is the rail ) and a cast hanger mounted to the door which holds the wheel . This hanger does not hold the wheel ridge however, the wheel can float down into the hanger more if the door runs up onto something left on the floor. This is to prevent the door from derailing, in this case however if the door does derail, the wheel falls down to the low spot on the hanger and has to be held up again in order to re-hang. To do this you need access to the wheels. Sorry, but the casing should be able to be coaxed off and replaced.... I also just yesterday saw a pocket door that was only rolling on a track built into the floor, and moved freely in a wooden box at the top. This design would be easy to re-rail when it jumped the tracks but then you have the problem of the floor being uneven because of the rail. back to Ask Eric page
|
We are remodeling our "modern" home to look more victorian. I will be adding siding to the outside of the house along with a lot of trim and millwork. I can't seem to find the historically correct width for the siding. A lot of the websites I have been looking at appear to sell only wide siding. (Looks more colonial in style) Most of the historical pictures I see of Victorian homes seem to have thinner siding. Do you have a suggestion of the width and length of the planks we should be looking at and any manufactures?
|
You didn't say where you were writing from so I will talk about the siding used for most all Victorians here in the west. During the time of the Victorian era, approximately 1875 to 1910, siding was one of the few items that was mass produced by bigger mills. Back then sawmills not only produced lumber but also made finished products such as siding. They chose to make sidings rather than many of the other more specialized moldings because every house needed siding. The sizes ranged from 4" to 12" with the vast bulk in the 6" and 8" size (8" being the most common). This is peculiar for today, as 8" is an orphaned size for most sawmills and hard to find. As for the styles, the vast majority of all Victorian siding was a variation of ship lap. This worked the best in shedding water and held up well to the warping effects of sun light. The patterns varied from sawmill to sawmill and because each molder man hand ground their own knives there was a difference even in the same patterns. (I have ground four set of knives to reproduce the same drop-lap siding for four different jobs. Each looked the same but were a little different). Once you have picked your pattern the next decision will be to choose the grade of material you will need. 'Clear all-heart' is best, with 'clear' next best. Both of these are expensive so for a little less, you could use a "sound, tight-knot" product. The millwork shop that you have make the siding, can help you decide. Hope this helps. back to Ask Eric page
|
How do i join a PVC gutter to a wooden gutter?
|
Well, I must say that you win the "Head-Scratcher Question of the Year Award" for this one. I have given it a lot of thought and here's my suggestion. First, if you are joining the wood gutter to the down hill side of the water run I think you will have better success. Either way the PVC will need to lay in the trough of the wood gutter. I believe one can accomplish this by heating the PVC with a heat gun and forming it to the shape of the wood gutter trough. This will require care and probably some experimentation, but should work. Once formed, it will be a mater of simply applying a bed of caulking into the wood gutter trough, placing the pre-formed PVC over the caulk bed, and nailing it down with small brass brads. Hope this helps and good luck. back to Ask Eric page
|
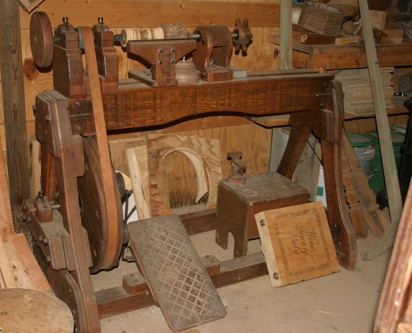
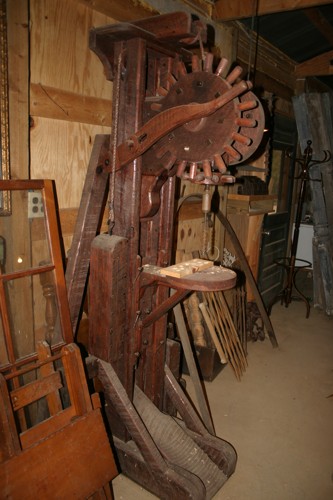
I am attaching pictures of two pieces of wood working tool ( 1, 2 )to see if you can help me identify them. Eventually, I am selling them, but I want more info about them. The wood lathe has an insignia on it that says "patent pending 1826". The drill press also has "1826" on it. I would appreciate any help in beginning a search for its origin and value.
|
These are great and I must tell you I would like to have them. Having said this I think that I can still be fair in a worth assessment for you. I don't know the manufacturer and without some sort of identification, tracking down the original maker may prove way more trouble than necessary. There is a good chance that the tools were made somewhere within your region. If that fails, check the patent office and search for lathes and drill presses from 1826. Chances are that they didn't get a patent but the paperwork might show up. Each patent needed drawings and you could match the drawings to your tools. Having said all that I would think that to the right museum setting each of these would be worth $1500 to $2500. I happen to know a state park that is trying to recreate a 1840's wood shop and if your interested I could put you two in touch with each other. I hope this is of some help. back to Ask Eric page
|
I live in an 1887 Victorian home in Kansas City with very thin hardwood flooring. I was curious how they were able to make floors that thin back then? What machine did they use? Is it possible to recreate that flooring with a decent table saw and good routers and a planer? My understanding is new hardwood flooring is cut with saws that have very fine precision, much more exact than running through a table saw by hand, but did they have that same precision back then?
|
By 1887, the Industrial Revolution had been in full swing for about 30 years. Four sided molding machines were already on the market and had been for 20 years. A four-sided molding machine is like four planers. There's a top-head, a head for the outside edge as well as one for the inside edge, and a bottom head for underneath the board. The four sided molders we use here are from 1902 and 1912. These machines still produce class 1 work today, the reason they could make such thin flooring for your house is because of the quality of the raw material they had access to, old-growth lumber. This is not to say that you can't do it today with a table saw, router, and planer. I would encourage you to make it yourself as any slight imperfection that may occur will be cured with a sanding. If you get any edge imperfections once you put the boards together, allow the sanding dust to fill those edge gaps , then float a first coat of floor sealer over it. This will harden the sanding dust and fill your edge imperfections. Good Luck! back to Ask Eric page
|
Hi Eric. I have two questions for you. My husband and I are purchasing a beautiful 107 year old Victorian home. Throughout the house I see wood trim, especially doorways, that seem to be varnished in either a glossy, translucent black or a very deep black/brown. It's beautiful, but I have no idea how to go about reproducing that effect on other woodwork that has been painted. My parents' home has this same interior trim varnish, but they also have no idea how to reproduce it. My grandfather built mom and Dad's house in 1902, before Dad was born. Is this a time-worn effect or was the wood likely black/brown from the beginning? My other question is what to do about some door frames that have become almost flush with the walls because the walls have been drywalled out over the original plaster. Is there nothing to do but remove the drywall and replaster? Thank you for your time and have a great day.
|
In regards to the finish question first, unless your grandparents were fairly wealthy people, the wood was probably finished dark. During the Victorian era, it was considered elegant to have dark woods like fruit woods, walnut, and cherry, in the interior of the home. Only the less affluent would have light-colored oak.To get around this class distinction, early finishes would add darkening to produce a darker wood effect. The original finish was no doubt shellac, you can buy shellac today and reproduce the same finish by taking amber shellac and adding a little lamp-black to it. You can buy both the shellac and lamp black from art supply houses. You may produce your own lamp-black by taking a kerosene lamp and turning the wick up to high so that it smokes. You may then scrape the deposit off of the chimney. It takes very, very little lamp-black to produce a much darker finish. As for the second question, the casing. You could have a local wood worker make you a square edge, surfaced four sides, fill-it board that is the exact same width as the casing. Then remove the casing, put the fill-it board on and apply the casing over the top of the fill-it board. The casing now will stand of proud of the drywall. back to Ask Eric page
|
We have pocket doors in our home. One set is wood panels and the other set is glass panes. The set with glass panes has 4 lines of etching on EACH individual pane. I think it is quite unsightly and am interested in replacing the doors. What brands would I look for that would have clear panes with maybe one pane having the tempered glass information instead of each pane?
|
I know how unsightly the tempered etching can be.You can order tempered glass without the etching and the glass manufacture will write a letter stating that the glass is indeed tempered. We have found that in some locations the building inspector will accept this letter as proof of tempering. If not another route you can take is to order laminated glass instead of tempered. This is the same glass that your car windshield is made from and meets the specs for safety glass without the etching. Hope this helps. back to Ask Eric page
|
I had you copy and make some corner blocks for my floor trim from a 1895 house in Cleburne Texas and they are all installed and look great. I am looking at what to do about my crown mould and was wondering if there are any victorian corner blocks for the ceiling so that you do not have to make miters. I am looking for something that is original victorian and not a new concept like they sell at Home Depot. I have found some crown mould pieces in my walls and none on the outside or anywhere else in the house and I am guessing this is what the house had originally and I do see it in your catalog.
Looking forward to your answer.
|
Well I have been in this business many years now and to the best of my recollection I have never seen a corner treatment for a crown molding other than mitering. Now this is not to say they never existed but I have never noticed one , and the more I think about it the better an idea it sounds. I could see a face design set into the corners or a flower or leaf design or grape clusters standing proud and the crown dying into them. It would take a big room to pull off this kind of look for the corners would be large and predominate but WOW what a look it would be!
If you ever see a crown corner block please send me some information. back to Ask Eric page
|
I have a Redwood tree next to my house in the historic part of Woodland, CA. The tree has dead branches and each year looks a little worse. My house is over 100 years old and I bet the trees (I have one good one remaining) at about that old also, they are over 100 feet tall. How can I sell the tree for harvesting instead of paying to have it cut down for firewood? Any suggestions would be helpful.
|
Because of the timber harvesting laws in California, and the fact that it is only one tree it would be difficult to find a large mill interested. You may want to look for a small portable sawmill operator that can bring the mill to site and work the tree up there. The phone book would be a place to start, if no luck there look up the number of a forester in your area and ask them for names of small operators. back to Ask Eric page
|
I came across your name in the September 2007 issue of Country Living. We purchased our home in Red Bluff, CA (Dec. 2003) and have been doing repairs to get it water tight and cleaned up mostly. We don't have a picture of what the widow's walk would have looked like and the home has a wrap-around porch with a flat roof above that we are sure had some type of railing when it was built. We would love to have your insight or pictures of what you think should be there.
Thank you for your time. I can send you a picture if you would like.
|
It's hard without seeing a picture of the house but one insight I can give you is that to look proportionate the widows walks were shorter than a standard ( porch) balustrade, usually about 26 to 28 inches instead of 36 inches. This can still be done legally if there is no door access to the roof. back to Ask Eric page
|
I have an 112 year old victorian house in Boston with a wrap around front porch. The porch roof ends at a two story bay window. The roof's wood gutter terminates perpendicular to crown molding that runs around the rest of the house. It's a nice looking detail, but not surprisingly I have water problems at this spot. When the snow started to melt after last weeks snow storm, water started coming through the wall above the window and into the house.
I shoveled all the snow off the porch roof and cleaned the ice dams out of the gutter. I discovered that although it looked intact, the crown molding had rotted where it meets the gutter. I pushed my finger through the rot and realized that there was no flashing behind the crown molding or against the sheathing. There was only a lead skirt covering the mitered joint where the gutter meets the crown, and that had separated.
I realize I have to strip away the house shingles and cut out some of the crown molding in order to install some kind of ice and water shield behind the gutter.
Do you have any recommendations?
|
This detail where the crown coming down the rake meets the end of the gutter and transitions the line from horizontal to the rake pitch is very beautiful, however it is a bear to try to stop for water. They originally used lead as the end cap you said and that would have worked however I'll bet they used steel nails to attach the lead. This sets up electrolysis and eats the lead in no time. I would use sheet copper for the end cap and copper nails to attach it. This should solve your problem. P. S. remember to save the end of the crown that you cut off so you have it as a pattern to male your new connection, this joint is very tricky.. Good Luck. back to Ask Eric page
|
Hello! Now that our new porch's balustrade is completed, we realize that the balusters have been laid with their thicker part up instead of down as is most commonly seen. It still looks quite nice but is it a capital offence enough to warrant turning them all around?
|
Heck NO. I have seen often balusters installed with the thick end up, I have even seen balusters that every other one was reversed. We must remember that the Victorian era was a time of experimentation and every millwork outfit was trying different things. Those that tell you that your balusters are upside down just haven't seen enough different samplings yet. back to Ask Eric page
|
I am a fire fighter in the central valley of California. The other day, I responded to a turn of the century home. While doing overhaul, I discovered what appeared to be redwood fiber in the attic. This took me a little aback. I have visited your mill in the past and know you have expertise in Victorian construction. Was it common to use shredded redwood fiber for insulation in this period home? If so, would you know the common years of construction this is found in.
Any information would be greatly appreciated.
|
Yes I have seen Redwood used as insulation. The product was ground up Old Growth Redwood bark and was known to be very fire resistant as seen in the woods during a forest fire where the thick bark of the old redwoods kept the trunk from burning. I believe the practice wasn't used until the advent of the shredder in about 1890 and used up until the teens and early twenties. Hope you were able to save the house and thanks for all you do. back to Ask Eric page
|
My daughter asked me a question that I have not been able to find an answer.
What is the Glass INSIDE a window called? I am not referring to the peep hole or the Fanlight above the door. If there is a semi-circle or small square decorative glass in the door, or even semi-transparent, is there a proper name given to this door glass?
I do appreciate the help.
|
Hi , the window in a door is called a LITE ( LIGHT is another spelling). If their is only one window in the door it is a single lite door, if their are 6 panes of glass in the door it is a 6 lite door.
Hope this helps. back to Ask Eric page
|
Do you have any experience using hemp batts or granulated cork as building insulation? We are considering these products as an alternative to fiberglass within the attic space of a 1908 wood frame house. Any known suppliers on the west coast? Thanks for your consideration.
|
Well, living here in Humboldt county in Northern California one would surely think that I would have heard of using “Hemp” for insulation, but alas I have not. That was a little bit of Emerald Triangle humor. What I have seen and know was used a lot here on the North Coast was Redwood bark for insulation. It was shredded, and dried and tied into bails and put in the walls and attics. It was also used as a fire proofing in the same manner. Because of the wide spread use of Redwood bark which is very fibrous and stringy I would think that Hemp would also work. I don’t know about the cork.
Great question, thanks… back to Ask Eric page
|
I have a 70 year old steamer trunk in fairly good condition that I would like to refurbish or have refurbished for my daughter. The trunk traveled with my mother to Hawaii in 1939 where she met my father. I live in Long Beach, California and my daughter lives in Arroyo Grande, California. Is there someone in either area that could refurbish the trunk? Or is there a way for us to refurbish it? It would not need to be perfect just a little more presentable. The leather has deteriorated and it would be nice to have it clean on the outside and the metal polished or painted whichever is more appropriate as they are black metal. The inside has what looks like wallpaper however other than a musty smell has minimal tears in it.
We would appreciate any suggestions.
|
As for your trunk you are very fortunate to live in an area with many museums. What I would do is to contact museums near you starting with some of the smaller museums first and see and see if they have a conservator that will take on small side jobs. This way you will be sure to find a craftsman who is respectful of your project and it’s historic and sentimental value.
Hope this helps and please do send me a picture of your finished product. … back to Ask Eric page
|
I’m from South Africa (Johannesburg). My brother is restoring an old wagon like the ones used in the trek to the West? Ours were pulled by oxen instead of horses. I was wondering if you could get me any information on this.
|
Oxen are a wonderful animal and they can put out tremendous power in short bursts. If we had relied on the horse to get our wagons out west we would still be in Kansas because the horse doesn’t have the stamina needed for heavy hauling. One point of interest that I find fascinating is that in 1985 the book DROVERS was published. It was written about the men and woman that supplied the outback of Australia using Ox teams. At that time there were men alive that started trekking supplies in with Ox teams, then went to trucks and are now delivering supplies with air planes. BOY! ~ talk about horses to rockets in one life time! Oxen were our first draft animals and were used through out history because of their slow steady work habits, however this same attribute was what put them out of favor with the beginning of the industrial revolution. The reason for this was that when we started making mechanized farm machinery that was powered by the rolling of the drive wheel, the oxen didn’t walk fast enough and they needed a hotter blooded animal (the horse) to make the machinery work properly.
I have a great book for you to get on Oxen called The Oxen Handbook, written by Drew Conroy and Dwight Barney, it was published by Doug Butler of PO Box 370 Maryville, Mo 64468 in 1986. It’s Library of Congress Catalog Card Number is 86-71908.
Hope this helps, if your question was about the wagon instead of the Oxen please email me again. … back to Ask Eric page
|
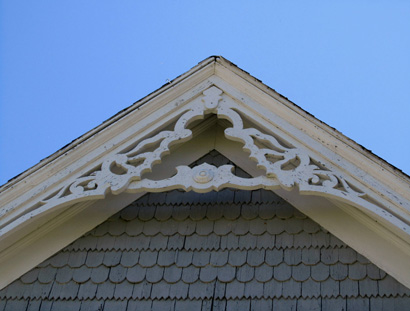
I found you on a Google search, so decided to email you. See attached picture (here) I was wondering if there was something we can use to preserve this gable decoration. We bought this old farmhouse and we are renovating it. I was wondering if there is anything we can paint over it to preserve it. It is wood. The house will be resided, reroofed and get new soffits, etc., and ideally, I would love to have this same exact gable decoration in a PVC type material, but if you know of a way we can preserve this without having to pay an arm and a leg, could you let me know? I sure would appreciate it. I want it to be white, and I know it is already old, so I need to keep it from rotting ... right now it looks like it needs new paint, but I was just wondering what ideas you would have. I'm attaching a picture of it. I really love this and want to keep this for the house or something just like it. Let me know your ideas. THANKS!!!
|
Congratulations on your new house. From the picture the gable decoration looks to be in GREAT shape. This is a testament to the original craftsmen to have it last in this good a shape for all these years. The best thing you can do for the decoration is to have it scraped and primed with the best oil base primer then paint it with the highest quality Sherwin Williams (any true paint brand but not a Home Depot etc. brand paint) exterior white you can find. One thing to know is that nothing including PVC is maintenance-free in the weather. In the case of PVC it’s not the water but the sun light (ultraviolet) that tears it up. Aluminum is constantly oxidizing and wood can rot. That’s what makes paint the first line of defense and even it is degrading all the time and so must be re-done. ... back to Ask Eric page
|
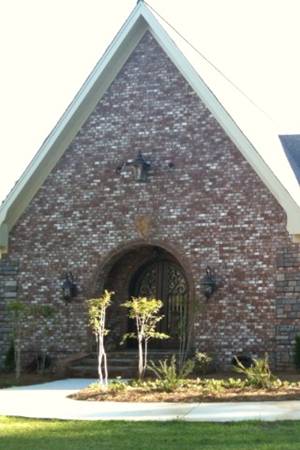
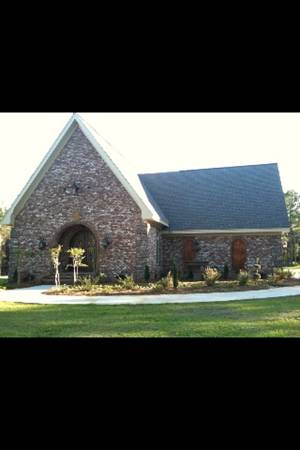
I would like your opionion on the front of our house (1,2). I drew this plan by a old catholic church and it turned out great but the front is missing something....do you have any suggestions? We thought about gable trim. We just want to keep that castle look and NOT country look. HELP!
THANKS!
|
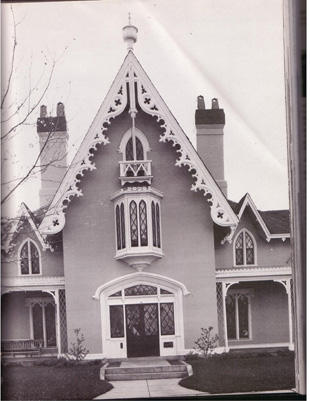
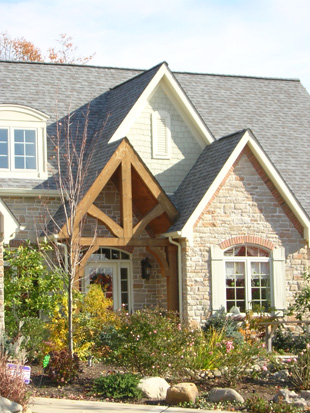
Very nice house and I see the castle look. I am attaching two pictures for ideas. One is Carpenter Gothic and the other is Timber framing. Hope this helps you get more ideas.
(Carpenter Gothic, Timber Framing) ... back to Ask Eric page
|
I'm trying to spruce up plain solid doors by making simulated panels by adding molding to the door. What kind of molding should I be looking at to use for this purpose? Any other advice would be appreciated.
|
Most of the time we see this build up done with a “bed” molding, and we are use to this look. However it always looks unnatural to me as the bed molding has a flat side that should fit into a recess but is exposed in this application. I have always thought that a better “fix” would be a molding that has only the back side flat and both edges die into the field of the door. I am going to try to add a picture of the two, One being a bed molding and the other a 3 bead molding. You see what you think. (Sketch here) ... back to Ask Eric page
|
The purpose of this email is to ask about techniques relative to building a stile & rail door out of old growth redwood.
I am in the process of building my first stile & rail door. I am retired and a somewhat experienced rough / finish wood worker having added on to my home after retiring - but have no experience building doors. I have done some research and am confident I can do it. However, I have a question or two to increase my confidence. I'm hoping you can offer a tip or two.
I'm building a medium sized storage shed for my neighbor as a favor. Redwood is his choice of finish work and the custom door is an idea I had. I have created a conceptual design for the door. 42" wide by 80" tall. Rail & stile design with two panels. I have purchased and planed some old growth vertical grain clear heart redwood from a local source which I plan to use for the stiles & rails. I'm still looking for the panel material, but anticipate getting some curly redwood or burl pieces 1" thick.
My question is: For the two panels of the door design, should they be "free floating" within the tongue & groove framework I plan to create, or should they be glued and pressed into the final assembly?
I appreciate any guidance you can provide.
|
First, to answer your question: the panels are always floating in the groove produced by either a rabbit or moldings. This allows the large panels to expand and contract as the weather changes. Using a rabbit to make the groove was a very standard method for inexpensive mass produced doors at the turn of the century. The problem in my mind with this design is that if the panel is broken there is no way of repairing it without cutting one of the groove lands off to remove the panel. If you make the groove with only one fixed land in the beginning and use molding to make the other land then the molding and panel can be removed anytime in the future.
Secondly, what is your connection going to be between the styles and the rails? Hopefully on a 42" wide door you will be using a rail tennon that then fits into the style mortise. This would be better than dowels, but if you are going to use dowels use the largest dowels you can and use at least three at each union. Also on a 42" wide door you may want to think of splitting the bottom panel into two with a center vertical style that is tennoned into the bottom and middle rail. This will help to lock the styles and rails together and keep the door from "sagging" over time. Hope this helps. ... back to Ask Eric page
|
Can you tell me the name of the block pattern for door/window trim in our 1893 Queen Anne? (blog photo) Did the patterns have standard names?
|
I went to your blog and saw your house picture. You have a beautiful house and it looks very cozy in the snow. The picture of a corner block you sent me is made in a three step process. First the board is run through a molder and the pattern is put on both top and bottom, then the long board is cut into the 6” lengths and the “crown notches” on the top are cut into it with a band saw or scroll saw. Then the flower design is carved into the center flat using the chip carving method. You will have to compare two or more of your corner blocks to see if they are identical but I would guess that these were hand carved for a good chip carver can work very fast. As for the design itself they did not seem to have names outside the trade itself, in other words a carver talking to another carver may say I did such and such flower design today but in the catalogs that design was only referred to as corner block number XXX. I have asked two friends in the carving field and one called your design a straw flower chip carving and the other had no name. I did find a referral to a straw flower chip carving design in an old furniture catalog and although there was no picture the description made it sound very similar. So all that being said I think that if you wanted to name your corner block design you could safety call it a straw flower chip carving. Have fun with your lovely house. ... back to Ask Eric page
|
Is it reccomended to use a heat gun as a paint removal method on redwood (1901 Victorian)? I would like to quickly, inexpensively but safely remove paint from the interior door jams and trims through out the house. TIA!
|
I have used a heat gun on Redwood many times. The trick is to not get impatient and keep the gun 8 inches or more away from the wood. The reason for this is that Redwood will surface burn easily. I suggest that you start on a casing in the back of the house or a closet. Then if you make a mistake it won’t be noticeable. I don’t know about the safety and never thought about it. Maybe it would be good to wear a mask. I will tell you that it is slow but the finished product is well worth the time. ... back to Ask Eric page
|
Our home was built around 1850. Under the eaves there are corbels which run around the house. Some of them have extensive water damage and we need to replace them. What information do you need to provide a quotation for custom corbels? We can supply photos, measurements, and a traced outline of the corbel. Also we don’t know what type of wood is appropriate and would need help in choosing the correct type. What is the approximate lead time for custom work also. We appreciate your help.
|
Boy you have it exactly. From photos with a tape measure held along side and a tracing we can reproduce your corbels. As for wood I would recommend Redwood as it will hold up the best. Our lead times run from 4 to 8 weeks for most jobs. Hope this helps. ... back to Ask Eric page
|
I have a brick house in Wisconsin built around 1880-1890. The window sashes and glass have a 4" arch in the middle. I am planning on using corner blocks and arched casing. I know usually arched windows and door frames would've probably had something more simple. Have you ever seen corner blocks on arched doors or windows?
|
Yes, I have seen corner blocks used on an arched molding with great effect. Corner blocks were used because there is no way to hold paint on a mitered joint. As the wood expands and contracts over time it cracks the paint at the miter. With a corner block this is not a problem because there is a shadow line at the corner block already. ... back to Ask Eric page
|
I am hoping you can help me with a question I need help with
What saw is best for cutting out wood brackets and gable decor work? I need your opinion on which is best to buy for this kind of work.
Thank You Kindly!
|
First of all let me say great for you for wanting to do millwork. I think it is very rewarding. The answer to your question is that it is best to have two saws but not imperative. The first is a band saw and the second is a scroll saw. The band saw does 90% of your cut out work. A smack 12” saw is fine for most work however make sure that you have a lot of room around the in feed and out feed for on long work you will need to either build tables in and out to support your work. Wax these tables good so you aren’t fighting the drag of wood on wood. The scroll saw is for “blind inlet work” . This is cutout work where there is no opening to the cutout from the outside of the piece and as such no way to get a band blade into the cutout. These cutouts are accomplished by drilling a hole in the waist part of the cutout and inserting the scroll saw blade through the hole and reattaching it to the saw arm. Now you make the cutout and then release the blade and remove your piece. You now have a cutout with no opening to the outside of the work.
In both of these saws my only suggestion is to buy saws that are belt driven, meaning that the motor is separate from the drive and delivers power through a belt. This is because the motor can be changed either for a newer one or a bigger one as you understand your needs. Hope this helps. ... back to Ask Eric page
|
I have a small enquiry regarding medieval doors. I have been employed to remove a total of three doors to upgrade their fire rating and was wondering if you have any information that would aid their removal, they have been hung with hook and band hinges and fixed with pyramid studs, the doors date from around the 14th century.
|
Boy what a great project. After you get the doors off you’ll have to tell me how you improve their fire rating. As for removing the doors I would assume that the pyramid studs are a spike with the decorative pyramid hammered head. If so are these studs “deadened”? (meaning bent over). They are no doubt made from wrought iron rather than Bessemer steel ( today’s steel) Wrought iron is great as it does not rust but its down side is in it’s grain. This makes it brittle and likely won't straighten without breaking. Once this happens you will have two alternatives, either make new studs in the blacksmith shop or forge weld a new end out of wrought iron on to the original studs. I think I would try the second option first and keep as much of the original as possible. Hope this helps. ... back to Ask Eric page
|
Hoping you can help me out. Noticed online your wonderful collection of old Barnes tools. I have a No.7 style scroll saw and would like to get some new blades for it. The literature indicates that it uses a 7 inch blade. Do you know of any sources where I could get some replacement blades? Would appreciate any help in this area. Also, based on your experience with this saw is there any particular style of blade that you would reccommend?
|
Congratulations on owning a #7 scroll saw. The Barnes saws are all very efficient .The good news about the blades is that a Stanley 6 ½” coping saw blade will work well. The part number is 15-059. Hope this helps and many happy hours of scroll work to you. ... back to Ask Eric page
|
Thank you for a very informative web site, clearly the most professional, and instructional site on the web. I recently came across approximately 460 feet of old growth, (new old stock), Douglas Fir gutter, that had been stored in a New Hampshire barn for many years. I would have loved to buy your gutter, but this gutter was offered to me at $ 2.00 a lin foot, so it was hard to turn down. I will be installing it on my new home, located on Cape Cod, Massachusetts. So my question is: do most of the installation guidelines, outlined on your web site, apply to different wood species also, ie Douglas Fir?
|
Wow what a find, good for you. YES the same instructions for insulation hold true. Be sure to make the “lake beds” on your joints and it will work great. ... back to Ask Eric page
|
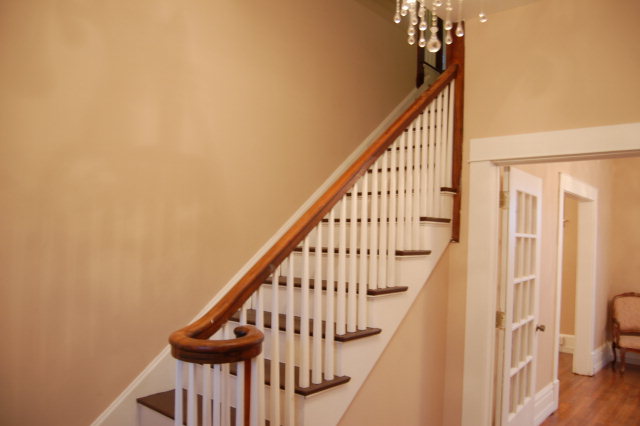
My husband and I just made an offer on a house built in 1899 classified as a late victorian on a neighborhood architectural survey. It appears that the house has undergone many "updates" particularly during the 60s. Specifically I am wondering about this staircase. This isn't the right style to be original, is it? Would it have had a square newel post? Could you give me a ballpark figure for how much it would cost to get this back to the right style? I know it's not a great picture but is the only one of the staircase from the listing.
|
It looks like a delightful house, but you are right about the balustrade. This is a modern adaptation of a Colonel design and is straight out of a catalog. Depending on the type of Victorian ( fancy or worker) the stairs would have had a square or turned newel at the bottom and a 1/2 newel at the top, two balusters per step and a larger handrail. You could also doll up the stairs with appliqués under each step on the riser board. Again this depends on the style of house. As for a ball park price I would say the new balustrade is in the couple of thousand dollar range, which is about what the one that is there now cost. Hope this helps. ... back to Ask Eric page
|
