
Where Even the Run-of-the-Mill is Extraordinary
Where Even the Run-of-the-Mill is Extraordinary
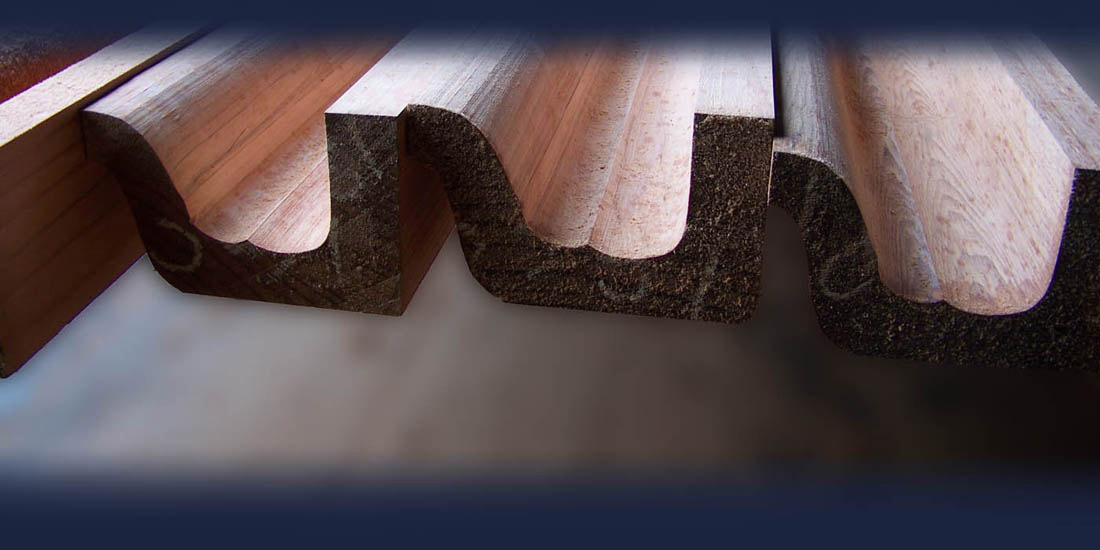
Thank you for your interest in, or purchase of, our redwood gutter. To our knowledge, Blue Ox is the only wooden gutter manufacturer in the United States able to custom match patterns. Our redwood gutter is made from all heart redwood. It is recommended to allow the gutter to sit for a few weeks prior to installation, as it is green when milled. This allows it to stabilize to its new environment. We have seen local homes, with this same type of redwood gutter, that are still solid after 100 years of service, and our 50” of annual rainfall.
Hanging the Gutter
There is no special trick to hanging the gutter. It should be nailed to the fascia board using again the galvanized-headed nails through pre--drilled holes. Try to nail through the fascia board into the rafter tails.
Gutter Joints
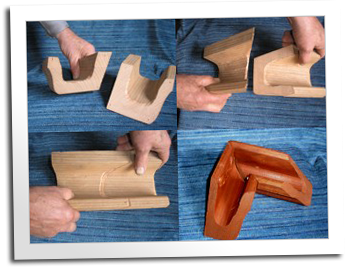
We at Blue Ox get more questions about joining redwood gutter than almost any other topic. We offer two explanations of the process. For the technically minded who enjoy diagrams, keep reading on this page for diagrams from the HUD manual on Historic Preservation (Eric wrote the chapter about redwood gutter). For the more hands-on learner, click on the link to the left and see photos of real-life gutter splices.
Click here to see photos and descriptions of redwood gutter splicing.
Gutter Joints (Continued)
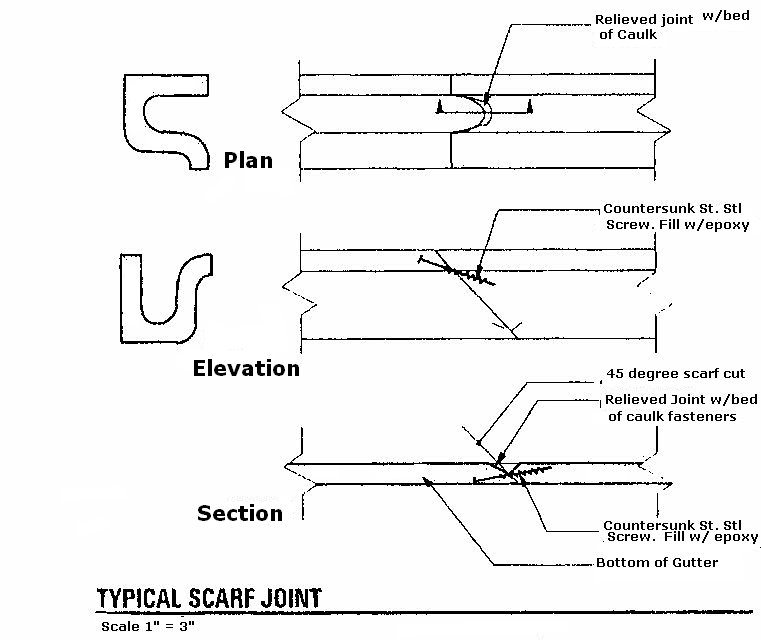
As for the joints, proper installation is essential. This requires that the inside of each miter joint be relieved. Once miters are cut and relief is made a good caulk should be applied to the end grain on both surfaces. We recommend either a poly butyl caulk or 3M 5200 marine caulk. The joint is then put together using only galvanized-headed nails through pre-drilled holes (see figure1). The inside of the gutter now has a hollow at the joint where the relief was made. This hollow is to be filled with caulk and smoothed to the level of the bottom of the gutter.
Click here to enlarge the gutter installation diagram
Gutter Joints (Continued)
It is this "lake" of caulk that has enough flexibility to move with the expansion and contraction of the joint. Relying on a thin film of caulk at the end grain of each piece will simply not work. Within a few years it will fail. The "lake", however, will last 20 years or more and can readily be detected and fixed before it fails completely. The "lake" can then be dug out and easily re-caulked.
Click to enlarge diagram of typical scarf joint.
Pitch
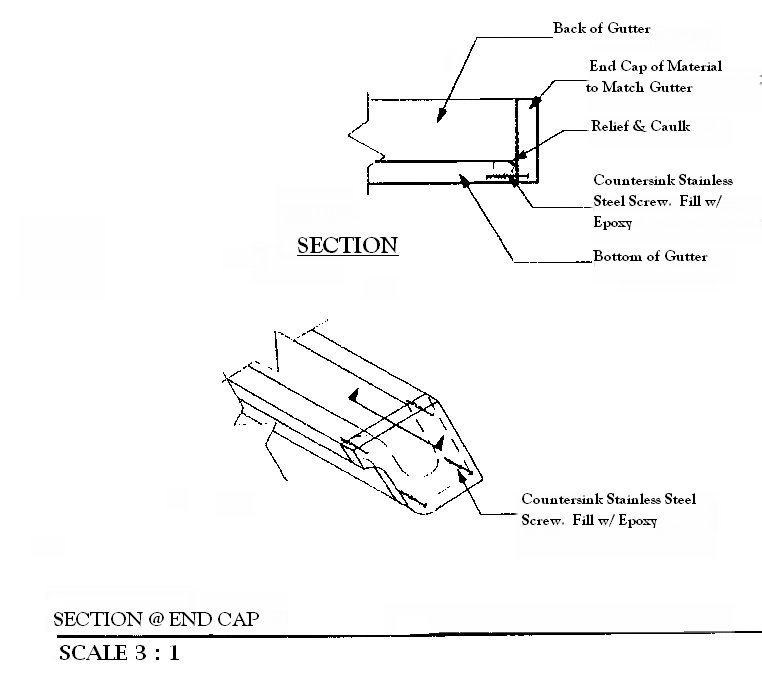
One interesting feature to gutter installation is the amount (or lack) of fall needed. 1/2" of fall in 20' is enough, because once the water finds the downspout, it's surface tension drags the water out of the gutter as a result of gravity, rather than having the water flow out. However, we like to see as much fall as possible without detracting from the lines of the house. This increased fall helps the water keep the gutter cleaned out If you have downspouts at each corner, start at the middle of your run, attaching the gutter with as much fall as possible ( not to exceed 20') dropping in both directions to your downspout locations. The ends of each run are capped with a piece of 1" redwood, band sawed to the profile of the gutter, and nailed with galvanized-headed nails. Remember to relieve the inside of the gutter here as well, and once capped, fill this relief with caulk.
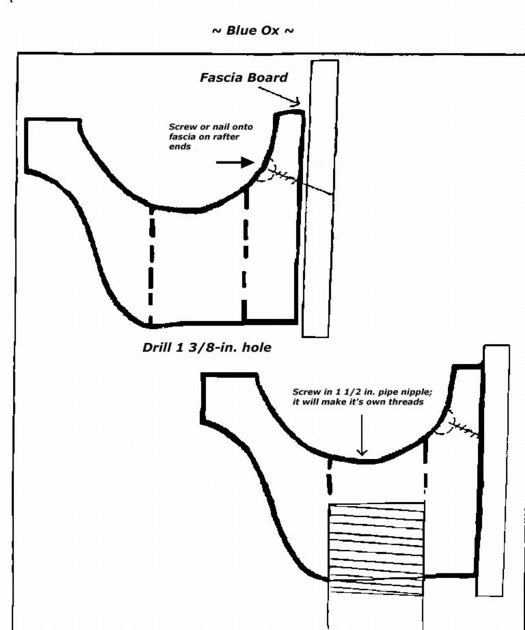
Downspouts
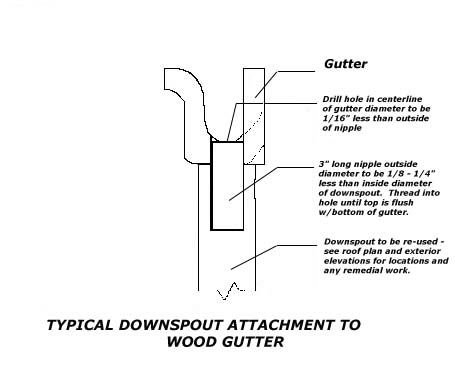
Another factor to consider is the downspout location. On the average, the house corners are the usual spot. On a very long gutter run, however, a downspout should be placed wherever they collect 1/3 of its volume of water. To facilitate the downspout connection, drill a hole 1/16" smaller than the downspout nipple. We use black iron nipples about 3" long and 1 3/8" in diameter. The nipple is then screwed into the hole in the gutter. Being 1/26" larger than the hole, it will make its own threads without damage to the gutter. This is the only water proofing required, as the threads inside will swell to seal. The nipple is then slipped inside a 1 1/2" downspout.
Weather is the #1 enemy of architectural woodwork. All rot is caused by three basic elements;
1) Food (the cellulose in wood),
2) Oxygen,
3) Moisture.
The secret to preventing decay can be summed up in three words: "Keep It Dry!" With that understanding, gutter then becomes one of the most important moldings on any structure.
Cleaning
Properly installed redwood gutters require little more than yearly cleaning if there are trees in the area. If the roof is composition shingle, we suggest a spring and fall cleaning to remove the pebbles that come from the roofing and tend to hold moisture in the bottom of the gutter. As with any exposed surface, our concern is to let it dry out. The cleaning can be aided with the use of a rubber spatula.
Care
The outside of wood gutters may be (and usually are) painted as a decorative trim on the building. The inside of the gutters should either be left alone or treated with only a non-drying oil such as shingle oil, a product of Chevron Oil Co. You can even use a lightweight motor oil or mineral oil, although shingle oil is the best. The reason for oiling the inside of the gutters is to keep the wood supple and protect it from drying out in harsh dry summer climates. Never use a drying oil such as Linseed Oil or Tung Oil. These oils dry, leaving a protective film on the wood surface. The problem with any film is that it eventually fails, allowing water to get underneath becoming trapped. When the wood is unable to dry it becomes the perfect environment for the rot fungus. Care, proper installation, and use of the special procedure at the joints are all important in achieving gutters that last for up to 100 years.
While the information on this website is believed to be true and accurate at the date of publication, neither the authors, webmaster, nor Blue Ox Millworks can accept any legal responsibility for any errors or omissions that may have been made. Prices listed on website are subject to change. © . Blue Ox Millworks. All Rights Reserved. Web Design by DHD